基础
Vagrant是一个基于虚拟机(VM)的统一配置开发环境工具,基于Ruby。
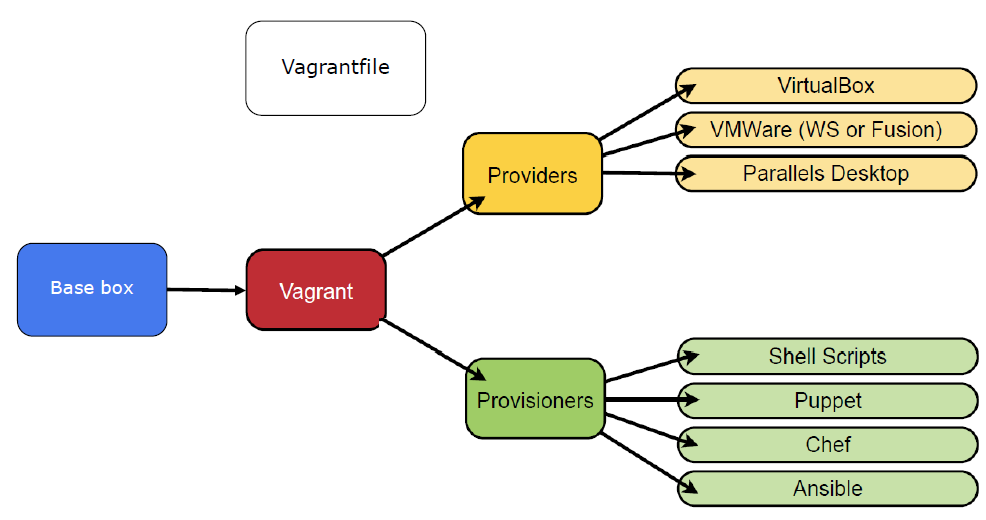
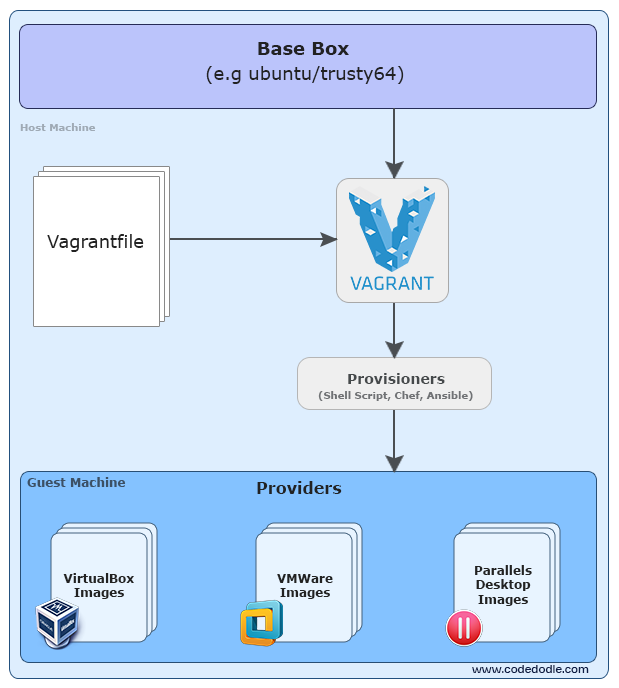
类似于Docker的Dockerfile,通过一个配置文件(Vagrantfile)来编写配置环境,实现统一的开发测试环境,底层是各种虚拟机工具(如Virtualbox,Vmware,Parallels等),称为provider;上层是shell脚本等,称为provisioning。
当前Vagrant虽然支持各种provider,不过对Virtualbox的支持是最好。
- 官方: https://www.vagrantup.com/
- 源码: https://github.com/mitchellh/vagrant
- 文档:https://www.vagrantup.com/docs/
Vagrant将image称作box。
- 官方box: https://atlas.hashicorp.com/boxes/search 暂时只看到搜索名称,没法下载
- 第三方box: http://www.vagrantbox.es/ 提供了各发行版/provider的下载链接,貌似官方的url也有
如ubuntu 12.04的box:
http://files.vagrantup.com/precise64.box
当时在国内下载太慢,看到有人推荐opencas。
网上看到几副原理图,讲解的比较清楚:
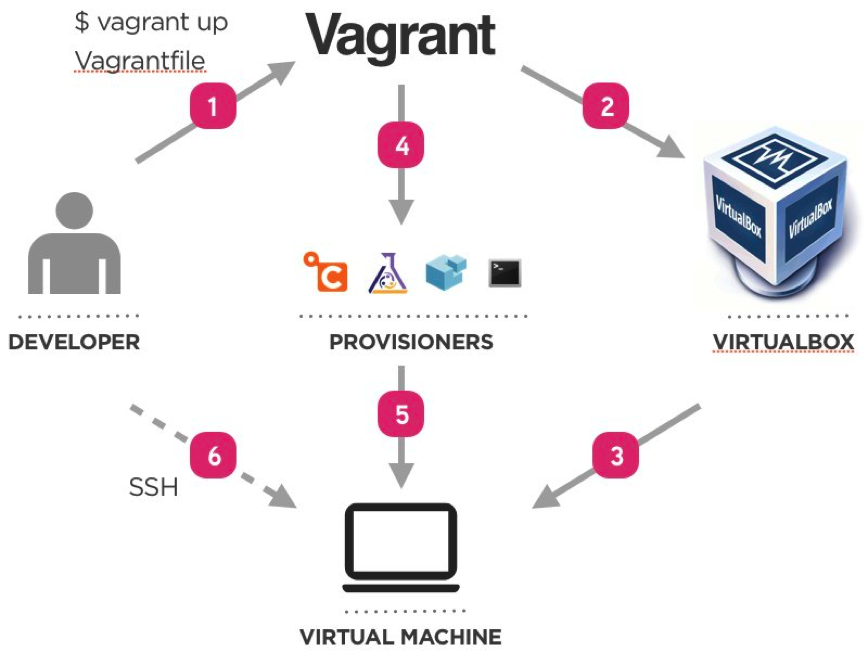
(摘自Vagrant Getting Started Create and Share Virtual Environments)
Vagrant和Docker还是有区别,前者是针对VM级别,后者是针对VE级别,更适用于application的统一配置构建。
同样网上有一个side by side对比图:
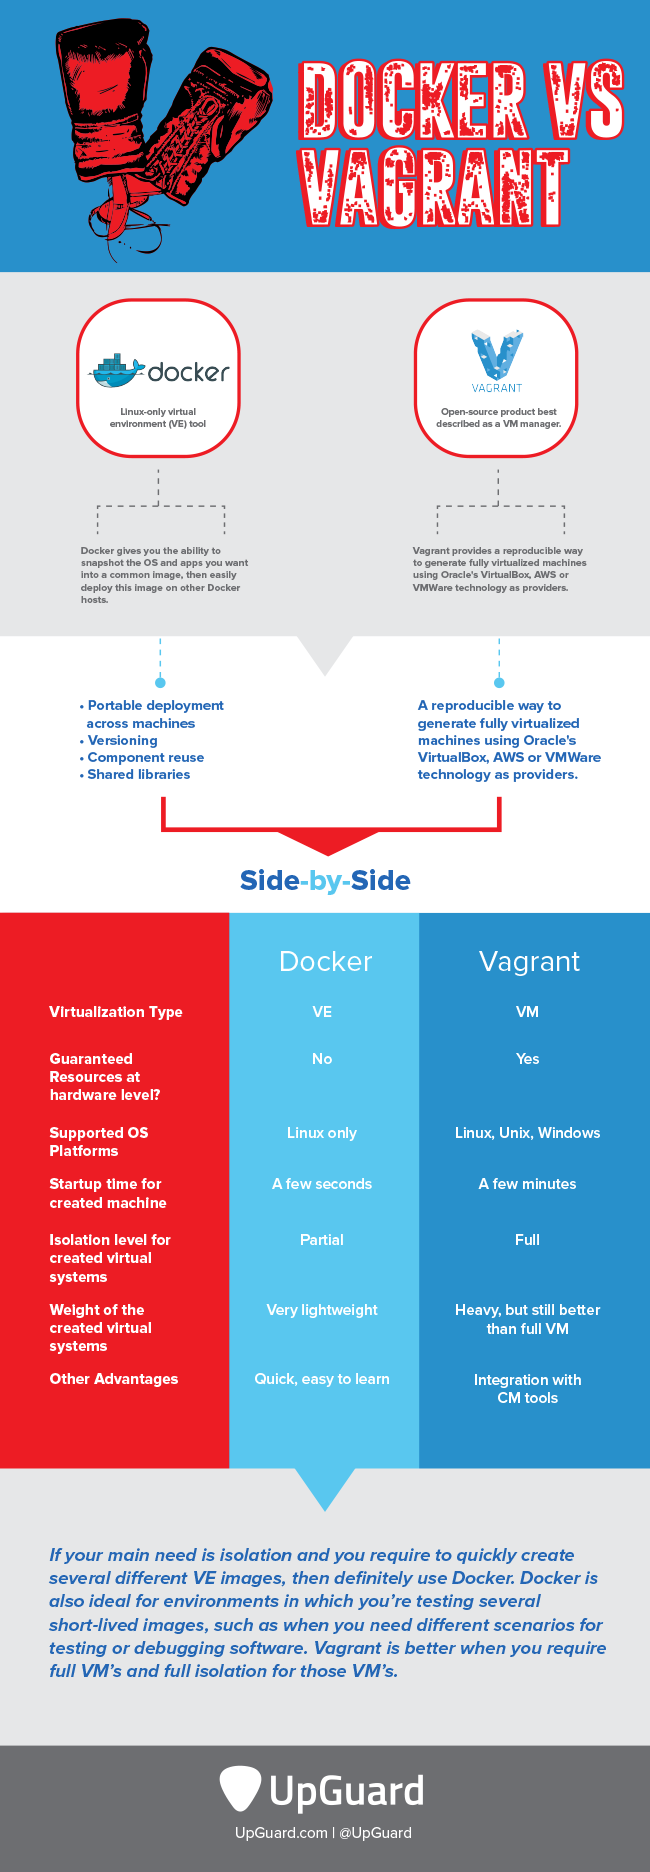
(摘自[Infographic] Docker vs. Vagrant)
更多相关的文章和讨论:
- Vagrant vs Docker PPT
- [Infographic] Docker vs. Vagrant
- Should I use Vagrant or Docker for creating an isolated environment?
- What is the difference between Docker and Vagrant? When should you use each one?
安装
MacOS下:
$ brew cask install vagrant
常用命令
生成初始的Vagrantfile:
$ mkdir vagrant_env && cd vagrant_env
$ vagrant init
指定box来生成Vagrantfile:
$ vagrant init hashicorp/precise64
添加(下载)box:
$ vagrant box add hashicorp/precise64
==> box: Loading metadata for box 'hashicorp/precise64'
    box: URL: https://atlas.hashicorp.com/hashicorp/precise64
This box can work with multiple providers! The providers that it
can work with are listed below. Please review the list and choose
the provider you will be working with.

1) hyperv
2) virtualbox
3) vmware_fusion

Enter your choice: 2
==> box: Adding box 'hashicorp/precise64' (v1.1.0) for provider: virtualbox
    box: Downloading: https://atlas.hashicorp.com/hashicorp/boxes/precise64/versions/1.1.0/providers/virtualbox.box
...
如果本地没有下载box,则init或者box add都会从官方源里下载。
因为官方源从国内下载非常慢,可以先通过其它下载工具将box下载下来,然后手动add。
通过本地box文件添加:
$ vagrant box add ubuntu1204 /path/to/precise-server-cloudimg-amd64-vagrant-disk1.box
==> box: Box file was not detected as metadata. Adding it directly...
==> box: Adding box 'ubuntu1204' (v0) for provider:
    box: Unpacking necessary files from: file:///path/to/precise-server-cloudimg-amd64-vagrant-disk1.box
==> box: Successfully added box 'ubuntu1204' (v0) for 'virtualbox'!
查看box列表:
$ vagrant box list
ubuntu1204 (virtualbox, 0)
根据指定的box来init一个Vagrantfile后,启动vm:
$ vagrant up
Bringing machine 'default' up with 'virtualbox' provider...
==> default: Importing base box 'ubuntu1204'...
==> default: Matching MAC address for NAT networking...
==> default: Setting the name of the VM: ubuntu1204-a_default_1462377211760_99376
==> default: Clearing any previously set forwarded ports...
==> default: Clearing any previously set network interfaces...
==> default: Preparing network interfaces based on configuration...
    default: Adapter 1: nat
==> default: Forwarding ports...
    default: 22 (guest) => 2222 (host) (adapter 1)
==> default: Booting VM...
==> default: Waiting for machine to boot. This may take a few minutes...
    default: SSH address: 127.0.0.1:2222
    default: SSH username: vagrant
    default: SSH auth method: private key
    default:
    default: Vagrant insecure key detected. Vagrant will automatically replace
    default: this with a newly generated keypair for better security.
    default:
    default: Inserting generated public key within guest...
    default: Removing insecure key from the guest if it's present...
    default: Key inserted! Disconnecting and reconnecting using new SSH key...
==> default: Machine booted and ready!
==> default: Checking for guest additions in VM...
    default: The guest additions on this VM do not match the installed version of
    default: VirtualBox! In most cases this is fine, but in rare cases it can
    default: prevent things such as shared folders from working properly. If you see
    default: shared folder errors, please make sure the guest additions within the
    default: virtual machine match the version of VirtualBox you have installed on
    default: your host and reload your VM.
    default:
    default: Guest Additions Version: 4.1.44
    default: VirtualBox Version: 5.0
==> default: Mounting shared folders...
    default: /vagrant => /Users/TankyWoo/vagrant/ubuntu1204-a
如果配置了共有网络:
config.vm.network "public_network"
则vagrant up时会让选择桥接网卡:
$ vagrant reload 25feab6
==> default: Attempting graceful shutdown of VM...
==> default: Clearing any previously set forwarded ports...
==> default: Clearing any previously set network interfaces...
==> default: Available bridged network interfaces:
1) en0: Wi-Fi (AirPort)
2) en1: Thunderbolt 1
3) en2: Thunderbolt 2
4) p2p0
5) awdl0
6) bridge0
7) vnic0
8) vnic1
==> default: When choosing an interface, it is usually the one that is
==> default: being used to connect to the internet.
    default: Which interface should the network bridge to? 1
==> default: Preparing network interfaces based on configuration...
    default: Adapter 1: nat
    default: Adapter 2: bridged
...
如果up时没有安装virtualbox, 会自动安装:
==>  Provider 'virtualbox' not found. We'll automatically install it now...
     The installation process will start below. Human interaction may be
     required at some points. If you're uncomfortable with automatically
     installing this provider, you can safely Ctrl-C this process and install
     it manually.
==>  Downloading VirtualBox 5.0.10...
     This may not be the latest version of VirtualBox, but it is a version
     that is known to work well. Over time, we'll update the version that
     is installed.
MacOS下可以先用brew cask安装virtualbox:
$ brew cask install virtualbox
查看本机的vm状态:
$ vagrant global-status
id       name    provider   state   directory
-------------------------------------------------------------------------
1f0bdd5  default virtualbox running /Users/TankyWoo/vagrant/ubuntu1204-a

The above shows information about all known Vagrant environments
on this machine. This data is cached and may not be completely
up-to-date. To interact with any of the machines, you can go to
that directory and run Vagrant, or you can use the ID directly
with Vagrant commands from any directory. For example:
"vagrant destroy 1a2b3c4d"
下面一些操作都需要进入init Vagrantfile的目录,或者指定id,可以通过上面的命令获取id。
SSH登录:
$ vagrant ssh
查看端口映射关系:
$ vagrant port
The forwarded ports for the machine are listed below. Please note that
these values may differ from values configured in the Vagrantfile if the
provider supports automatic port collision detection and resolution.

    22 (guest) => 2222 (host)
销毁vm (删除本地的vm,但是不删除box文件):
$ vagrant destroy
    default: Are you sure you want to destroy the 'default' VM? [y/N] y
==> default: Forcing shutdown of VM...
==> default: Destroying VM and associated drives...
provider使用PD
因为本机装了PD9(Parallels Desktop 9),如果在启动了PD的虚拟机后,又启动vb的虚拟机,则会导致PD的虚拟机直接关机。具体原因见:Mac reboots when you attempt to launch Parallels Desktop 8/9 and Virtual Box simultaneously,也可以看看这个讨论。好像PD10解决了和vb共存的问题,不过还得花几百大洋去升级,不值。
所以只能考虑把provider换成parallels,首先安装插件:
$ vagrant plugin install vagrant-parallels
下载支持parallels的发行版:
$ vagrant init parallels/ubuntu-14.04
以parallels为provider启动:
$ vagrant up --provider=parallels
在up时遇到这个问题:
The provider 'parallels' that was requested to back the machine 'default' is reporting that it isn't usable on this system. The reason is shown below:
Vagrant could not detect Parallels Desktop! Make sure it is properly installed.
Vagrant uses the
prlctlbinary that ships with Parallels Desktop, and requires this to be available on the PATH. If Parallels Desktop is installed, please find theprlctlbinary and add it to the PATH environmental variable.
本地找不到prlctl命令,这个是PD安装时自带的命令行工具。
把整个系统find了遍才找到:
$ ln -s /Applications/Parallels\ Desktop.app/Contents/MacOS/prlctl /usr/local/bin/prlctl
其它参考:
其它参考
- Vagrant介绍
- Vagrant 简介
- 使用 Vagrant 搭建本地开发环境的教程
- 开始使用 Vagrant
- 使用 Vagrant 打造跨平台开发环境
- Vagrant 配置和打包开发环境
- Vagrant简介和安装配置
- Vagrant - Go in Action Vgrant安装配置 / Vgrant使用入门