介绍
Let’s Encrypt 是一个新兴的免费证书签发机构:
Let’s Encrypt is a new Certificate Authority: It’s free, automated, and open. In Public Beta
摘自网上的介绍:
什么是Let’s Encrypt
Let’s Encrypt是由ISRG提供的免费CA服务。ISRG,即Internet Security Research Group,是一个由多个组织和公司共同资助的、旨在提高互联网通信安全的非营利性公益组织。Let’s Encrypt的功能简单来说,就是基于ACME协议提供了一套自动化的证书管理服务,包括证书的签发、更新、撤销等功能,而且这一切还都是免费的。
什么是ACME
ACME是Automated Certificate Management Environment的缩写,是一种在证书申请者和CA之间进行自动认证域名有效性并执行DV级别证书签发/作废等操作的网络协议,ACME协议的通信格式使用JSON,并完全基于HTTPS在client和server之间。该协议正在标准化的进程当中,目前还并不是十分完善,最新的draft可以在如下地址查看:https://github.com/ietf-wg-acme/acme
ACME协议本身比较独立,不仅仅是Let’s Encrypt在使用,也可以考虑和web服务器紧密集成,例如与tengine集成之后,就可以实现服务器主动发起证书新签发/过期续签的完全自动化,也就是获取到签发的证书之后,可以直接动态应用到tengine中,当然目前是没有此等功能的,后续如有机会也许能在tengine里实现一下。
原理见How It Works
- 协议说明 仓库 / HTML / 老仓库
- SSL/TLS 加密新纪元 - Let's Encrypt 里面对ACME作了简单讲解
生成证书
2016-05-14更新 Github上包括组织和项目都改名叫certbot了,letsencrypt-auto脚本也copy了一份,叫certbot-auto,不知道为啥……
另外它们也提供了一个certbot.eff.org,用于针对指定的webserver和system os提供相关的安装/配置方案。
letsencrypt 提供一个客户端工具 letsencrypt, 包含了自动化的脚本,快速的生成key, csr, 进而生成证书:
user@webserver:~$ git clone https://github.com/letsencrypt/letsencrypt
user@webserver:~$ cd letsencrypt
user@webserver:~/letsencrypt$ ./letsencrypt-auto --help
如果要显示详细的输出,包括各子命令的参数选项:
./letsencrypt-auto --help all
注:
2016-02-23 当前这个脚本在gentoo下有问题, 执行emerge的命令, 临时修改了才可以; 另外执行最新的已修复--help没有看到帮助...- 首次执行letsencrypt-auto时会检查环境,安装一些系统服务包,Python包等;本地测试环境下安装的Python包在
~/.local/share/letsencrypt,相当于一个virtual env了。
脚本的help输出感觉不是很详细,有点歧义,最好还是直接看文档:
申请签发证书:
./letsencrypt-auto certonly --manual --debug -d <example.com> -d <www.example.com> --email me@example.com
-d可以有多个,指定这个证书绑定的域名,这个生成的是单个证书还是分别每个域名一个证书?需要确认下。TODOcertonly只生成证书--manual表示手动验证--email(2016-05-06)当前-e不行,必须写长选项,且要放在-d之后……
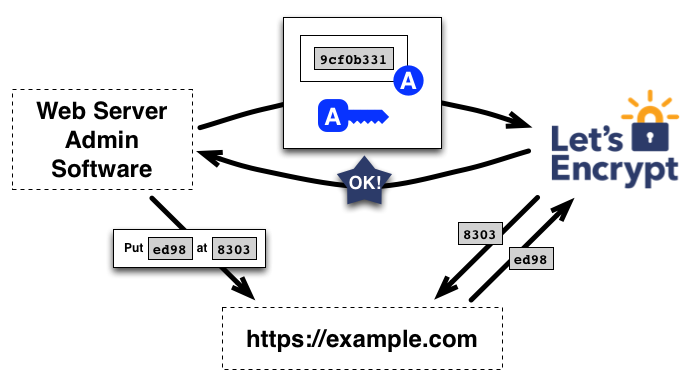
传统CA的验证方式一般是往「域名管理员邮箱」发验证邮件,而Let's Encrypt是在你的服务器上生成一个随机验证文件,再通过创建CSR时指定的域名访问,如果可以访问则表明你对这个域名有控制权。
所以除非是在这个域名自身的web server上操作, 否则需要指定 --manual (参考回答), 在本地服务器上操作, 中途会给类似提示:
Make sure your web server displays the following content at
http://www.example.com/.well-known/acme-challenge/h0Dq4VhR1auCxNPJlMsqZsGu973Q1BATzyOGuju7-_8 before continuing:

h0Dq4VhR1auCxNPJlMsqZsGu9p3QqBATzyOGuju7-_8.3u_l8dRYlRb-7ngu302BnLnkE0ZHhS691rZ0VudW9aQ

If you don't have HTTP server configured, you can run the following
command on the target server (as root):

mkdir -p /tmp/letsencrypt/public_html/.well-known/acme-challenge
cd /tmp/letsencrypt/public_html
printf "%s" h0Dq4VhR1auCxNPJlMsqZsGu9p3QqBATzyOGuju7-_8.3u_l8dRYlRb-7ngu302BnLnkE0ZHhS6m1rZ0VudW9aQ > .well-known/acme-challenge/h0Dq4VhR1auCxNPJlMsqZsGu9p3QqBATzyOGuju7-_8
# run only once per server:
$(command -v python2 || command -v python2.7 || command -v python2.6) -c \
"import BaseHTTPServer, SimpleHTTPServer; \
s = BaseHTTPServer.HTTPServer(('', 80), SimpleHTTPServer.SimpleHTTPRequestHandler); \
s.serve_forever()"
Press ENTER to continue
这里只需要在web server上配置一个验证域名所有权的上面指定随机url即可:
location ^~ /.well-known/acme-challenge/
{
    alias /tmp/letsencrypt/public_html/.well-known/acme-challenge/;
}
或者更简单的:
location ^~ /.well-known/acme-challenge/h0Dq4VhR1auCxNPJlMsqZsGu973Q1BATzyOGuju7-_8
{
    return 200 'h0Dq4VhR1auCxNPJlMsqZsGu9p3QqBATzyOGuju7-_8.3u_l8dRYlRb-7ngu302BnLnkE0ZHhS691rZ0VudW9aQ';
    add_header Content-Type text/plain;
}
确认配置ok后, 按Enter开始验证. 成功后给出提示:
IMPORTANT NOTES:
 - Congratulations! Your certificate and chain have been saved at
   /etc/letsencrypt/live/www.example.com/fullchain.pem. Your cert
   will expire on 2016-05-23. To obtain a new version of the
   certificate in the future, simply run Let's Encrypt again.
 - If you like Let's Encrypt, please consider supporting our work by:

   Donating to ISRG / Let's Encrypt:   https://letsencrypt.org/donate
   Donating to EFF:                    https://eff.org/donate-le
存放的pem和key在 /etc/letsencrypt/live/www.example.com/ 下, 本身是软链接.
- cert.pem 用户证书
- chain.pem 中间证书
- fullchain.pem 证书链, chain.pem + cert.pem
- privkey.pem 证书私钥
最后使用privkey.pem和fullchain.pem即可。
更新证书
Let’s Encrypt 签发的证书只有 90 天有效期,但可以通过crontab脚本定期更新。
一个是renew子命令,不过这个命令会更新所有即将到期的域名,不能指定单个域名:
Currently, the renew verb is only capable of renewing all installed certificates that are due to be renewed; individual domains cannot be specified with this action. If you would like to renew specific certificates, use the certonly command. The renew verb may provide other options for selecting certificates to renew in the future.
按照提示,可以使用certonly来更新指定域名:
使用--keep-until-expiring选项:
certbot-auto certonly --manual --keep-until-expiring -d tankywoo.com --email me@tankywoo.com
只有在即将到期的才会更新:
Certificate not yet due for renewal; no action taken.
也可以强制更新,用--renew-by-default选项:
./certbot-auto certonly --manual --renew-by-default -d tankywoo.com --email me@tankywoo.com
解析 certbot-auto
在使用 certbot 时,有一点比较让人恼火,就是隔一段时间再使用,运行时会升级,然后重新常见 venv 然后安装一堆包,甚至我想 --help 看个帮助文档也给先升级,等的让人恼火。
主要目的是解决几个问题:
- 不做自动更新
- 不删除旧的 venv 并重新创建 venv
- 安装包时使用的源是本地配置还是强制走官方 pypi 了?
所以看了下 certbot-auto 的脚本(目前版本 0.13.0),步骤主要是:
- 先确认是否是 root 用户执行,不是则设置好 sudo 所使用的命令,以及相关的环境变量
- 进入 Phase 1,即 else 部分
- 如果在 venv/bin 目录下没有 letsencrypt 可执行文件,则进入 Bootstrap 部分,这块会根据不同发行版,检查指定软件如 dev-python/virtualenv,dev-libs/openssl 等是否安装,如果没有则安装。就算都安装了,检查还是需要一点时间。
- 如果有 letsencrypt 可执行文件,如果没有指定
--no-self-upgrade选项,则会下拉最新的 certbot-auto 脚本,并和当前版本对比,如果有则更新 certbot-auto。这块也比较耗时。并影响后面。
- 进入 Phase 2 部分
- 如果更新后的 certbot-auto 版本和本地安装的 letsencrypt 可执行文件版本不一致,则删除 venv,然后重建 venv
- 然后通过脚本从官方 PyPI 上安装 pip、easy_install 等几个基本工具。对于国内来说,会比较慢,所以这块也是一个耗时的地方。
- 然后有一大串需要安装的 Python Package,通过 pip 安装,所以这块是会用到本地配置的 pip 源,如果有配置的话。但是也顶不住这么多包要安装,所以也很耗时。
- 都搞定后,就根据子命令,该签发的签发,该 renew 的就 renew……
总结(适合临时急着签发,平时不急的话可以更新下):
- 不要允许自更新,选项
--no-self-upgrade - 不用 bootstrap 去检查了,选项
--no-bootstrap
所以建议后续签发时执行:
# 签发
./certbot-auto certonly --no-bootstrap --debug --no-self-upgrade --verbose --manual -d example.com

# 更新
./certbot-auto certonly --no-bootstrap --debug --no-self-upgrade --renew-by-default --verbose --manual -d example.com
也可以开启 --verbose,自行观察具体哪块耗时。
其它
(2016-06-13更新)
试了下这个脚本,在它的基础上改了一些,签发/更新比较方便(其实就是重新签发)。核心是使用diafygi/acme-tiny,相对于certbot复杂以及各种环境检查,安装一堆东西,这个Python写的工具我感觉好用多了,在傻瓜式和使用上选择了一个折中合适的点。
其它参考
- Let's Encrypt,免费好用的 HTTPS 证书
- Let’s Encrypt免费HTTPS SSL证书获取教程
- 用Let’s Encrypt获取免费证书
- 免费SSL证书Let’s Encrypt安装使用教程:Apache和Nginx配置SSL
- 使用 Let’s Encrypt 开源 SSL 证书
- How To Secure Nginx with Let's Encrypt on Ubuntu 14.04
- 一个快速获取/更新 Let's encrypt 证书的 shell script | 另外一个
- Cipherli.st 提供了各种webserver和一些软件的ssl推荐配置
- SSL Server Test 站点https安全分析/检查
- 实践个人网站迁移HTTPS与HTTP/2