- 给Git输出信息增加颜色
- 关于Git的分支
- 远程分支
- Git标签
- Git 全局配置
- 使用vimdiff
- 查看提交log
- 文件中文名问题
- Git mv 日志问题
- 指定路径pull
- 查看指定目录下的 status
- 选择一部分修改提交
- 只从 git repo 中移除文件, 但不删除实际文件
- 修改最后一次提交
- 修改commit的author
- Git diff 技巧
- HEAD vs ORIG_HEAD
- git revert/reset/checkout 区别
- 统计每个提交者的提交次数
- git reflog
- git cherry-pick
- Git Commit Message 基本准则
- git add 只添加 tracked 的文件
- 删除untracked files
- 同一个文件选择部分提交
- checkout 指定的 tag
- git add的几个参数和通配符
- 检查repo是否dirty
- 检查repo当前HEAD是否提示ahead或behind远程仓库分支
- 获取当前分支名
- 删除分支
- Git本地设置某个远程库readonly
- 关于 HEAD^ 和 HEAD~ 的区别
- 查看两个分支的差异
- 查看某个commit在哪些release(tag)引进
- Git subtree & submodule
- git diff 相关
- git diff 一行太长, 输出混乱
- git fetch/pull 小记
- 缓存用户名/密码
- Git资料
Git的help信息非常好,很多可以直接help来了解
给Git输出信息增加颜色
编辑/etc/gitconfig
比如要对git status设置颜色,可以:
[color]
    ui = auto
[color "branch"]
    current = yellow reverse
    local = yellow
    remote = green
[color "diff"]
    meta = yellow bold
    frag = magenta bold
    old = red bold
    new = green bold
[color "status"]
    added = yellow
    changed = green
    untracked = cyan
参考:
- How to show git colors on zsh
- Enabling git syntax highlighting for macs terminal
- How to colours in git
关于Git的分支
参考的 何谓分支
因为Git是保存的快照,Git仓库有以下几个基本对象
blob对象用于表示文件快照内容tree对象记录目录树内容和各个文件对应的blob对象索引commit对象记录提交信息,指向tree对象或其他commit对象
Git的分支,其本质是一个指向commit对象的可变指针,Git使用master作为分支的默认名字
HEAD指针指向当前的分支指针
使用git branch是查看当前的分支列表
使用git branch branch_name新建分支,然后可以使用git checkout branch_name切换分支
最后可以用git merge branch_name来合并分支
如果遇到冲突,需要到冲突的文件下根据提示编辑后再commit
远程分支
参考的 远程分支
从远程Git repo克隆,Git会自动将此remote repo命名为origin,并下载其中所有的数据,建立一个指向它的master分支的指针,在本地命名为origin/master
但无法在本地更改其数据。接着,Git建立一个属于自己的本地master分支,始于origin上master分支相同的位置,这样可以就此开始工作
touch README.md
git init
git add README.md
git commit -m "first commit"
git remote add origin git@github.com:tankywoo/test.git
git push -u origin master
这里origin是remote repo name,branch name 是master
关于fetch和pull区别
What is git fetch? and what is the difference to git pull?
git fetch是update from remote repo,但是不合并
git pull是fetch and merge
Git标签
- 含附注的标签(annotated)
- 轻量级标签(lightweight)
删除远程标签:
git push origin :tagname
或
git push --delete origin tagname
Git 全局配置
全局忽略文件
使用vimdiff
默认的diff应该是使用diff命令, 这个命令也非常有必要掌握.
但是, 更直观的, 可以选择vimdiff.
# 配置Git使用vimdiff来做差异比较
git config --global diff.tool vimdiff
# 在merge时使用
git config --global merge.tool vimdiff
# 因为在使用vimdiff时, vim会有如下提示:
# Viewing: 'tkwiki/tool/git.wiki'
# Launch 'vimdiff' [Y/n]: y
# 可以取消这个提示
git config --global difftool.prompt false
然后就可以
git difftool tkwiki/tool/git.wiki
来查看修改的地方, 效果图:
参考:
查看提交log
git log 会查看当前git repo里所有的提交历史
git log filename 会查看这个文件的所有提交历史
git log -p -2 [filename] 会把最近的2次提交变更展开
git log --pretty=oneline [filename] 这个太牛逼了, 只显示id和提交说明.
git log --pretty=format:"xxxx" 这个更牛逼, 自定义查看log的输出格式
参考:
文件中文名问题
最近遇到同步文件下来, 中文文件名全部是unicode, 解决这个问题加配置:
git config --global core.quotepath false
Git mv 日志问题
在 git mv (rename) 文件后, 直接 git log 只能看到这个文件被 rename 后的日志, 想要看到完整的日志, 要用 git log --follow xxx
参考:
- Is it possible to move/rename files in git and maintain their history?
- What's the purpose of git-mv?
指定路径pull
以前都是 cd 到仓库当前目录然后 pull. 因为想到 svn up 可以直接指定路径, 这种基本功能 git 肯定会有的, 但是直接指定路径不行.
搜了下, StackOverflow 上的 回答1 和 回答2 非常给力.
Git 的参数 --git-dir 可以指定 Git 的路径, 即使用这个 .git 的配置等来更新 repo. 但是这个会以 pwd 为要更新的 repo 路径.
所以还需要 --work-tree 来指定要更新的 repo 的路径, 而不需要 cd 过去.
git --git-dir=/path/to/git-repo/.git --work-tree=/path/to/git-repo/ pull
查看指定目录下的 status
git status [path]
比如当前目录下的 status:
git status .
git status - is there a way to show changes only in a specific directory?
选择一部分修改提交
使用 git add -p filename。
具体见:
只从 git repo 中移除文件, 但不删除实际文件
git rm --cached file
默认使用 git rm 会把文件也一并删除掉.
修改最后一次提交
使用:
git commit --amend
如果当前 stage区 没有东西, 则相当于可以修改 commit comment.
如果 stage区 有新的文件, 比如有个文件staged后忘了和上次的提交一次commit, 则可以撤销并重新提交.
修改commit的author
如果是staged的文件,提交时直接指定 --author 就可以了:
git commit -m "xxx" --author="Tanky Woo <noreply@tankywoo.com>"
修改最后一次提交的author,可以配合 --amend:
git commit --amend --author="Tanky Woo <noreply@tankywoo.com>"
如果user config配置修改了,可以直接--reset-author:
git commit --amend --reset-author
修改指定commit的author:
* 2f1e828 - (HEAD, origin/test, origin/master, test, master) update test-git-submodule (2 days ago) <Tanky Woo>
* 3243b09 - first commit with submodule (2 days ago) <Tanky Woo>
* 5956ab0 - why conflict and merge? (3 weeks ago) <Tanky Woo>
现在想修改 3243b09 的 author name,需要从它之前的一个commit开始rebase:
TankyWoo@Mac::test-git/ (master) » git rebase -i 5956ab0
Git 会使用设置的编辑器打开如下:
pick 3243b09 first commit with submodule
pick 2f1e828 update test-git-submodule

# Rebase 5956ab0..2f1e828 onto 5956ab0
#
# Commands:
#  p, pick = use commit
#  r, reword = use commit, but edit the commit message
#  e, edit = use commit, but stop for amending
#  s, squash = use commit, but meld into previous commit
#  f, fixup = like "squash", but discard this commit's log message
#  x, exec = run command (the rest of the line) using shell
#
# These lines can be re-ordered; they are executed from top to bottom.
#
# If you remove a line here THAT COMMIT WILL BE LOST.
#
# However, if you remove everything, the rebase will be aborted.
#
# Note that empty commits are commented out
根据提示,把需要修改的一行用edit替换pick:
edit 3243b09 first commit with submodule
pick 2f1e828 update test-git-submodule
保存关闭后会提示:
Stopped at 3243b09... first commit with submodule
You can amend the commit now, with

        git commit --amend

Once you are satisfied with your changes, run

        git rebase --continue
如果要对first commit开始做rebase:
git rebase -i --root
我设置的PS1的括号里是分支名,可以看到现在的分支是这个要修改的commit id:
TankyWoo@Mac::test-git/ (3243b09*) » git commit --amend --author="Tanky <noreply@tankywoo.com>"
修改完后会进入下一个commit id分支,直接--continue,因为604c35c这个commit设置的是pick,所以不会做改动:
TankyWoo@Mac::test-git/ (604c35c*) » git rebase --continue
Successfully rebased and updated refs/heads/master.
再查看日志:
* 16c4757 - (HEAD, master) update test-git-submodule (2 seconds ago) <Tanky Woo>
* b9fbd8a - first commit with submodule (15 seconds ago) <Tanky>
* 5956ab0 - why conflict and merge? (3 weeks ago) <Tanky Woo>
SO上的回答:
For example, if your commit history is
A-B-C-D-E-FwithFasHEAD, and you want to change the author ofCandD, then you would...
- Specify
git rebase -i B- change the lines for both
CandDtoedit- Once the rebase started, it would first pause at
C- You would
git commit --amend --author="Author Name <email@address.com>"- Then
git rebase --continue- It would pause again at
D- Then you would
git commit --amend --author="Author Name <email@address.com>"againgit rebase --continue- The rebase would complete.
如果要修改指定用户全部commit的author:
git filter-branch -f --env-filter '
an="$GIT_AUTHOR_NAME"
am="$GIT_AUTHOR_EMAIL"
cn="$GIT_COMMITTER_NAME"
cm="$GIT_COMMITTER_EMAIL"

if [ "$GIT_COMMITTER_EMAIL" = "<OLD EMAIL>" ] ; then
    cn="<NEW NAME>"
    cm="<NEW EMAIL>"
    export GIT_COMMITTER_NAME="$cn"
    export GIT_COMMITTER_EMAIL="$cm"
fi
if [ "$GIT_AUTHOR_EMAIL" = "<OLD EMAIL>" ] ; then
    an="<NEW NAME>"
    am="<NEW EMAIL>"
    export GIT_AUTHOR_NAME="$an"
    export GIT_AUTHOR_EMAIL="$am"
fi
'
这个在github官方help里也有脚本。
StackOverflow上有两篇讨论非常好:
(2017-12-20补充)
强制同步远程并覆盖本地历史。
比如某个项目,用如上方法修改了所有提交的用户名和邮箱,然后想更新线上一批机器的这个项目。第一个是想到 git pull --force,但是此方法会做一个合并,所以不行;另外想到 git fetch; git merge -X theirs master 也不行。
后来搜到 这个回答:
git fetch
git reset --hard origin/master
首先在线上环境这种只做 clone、pull 等操作(核心是 fetch),如果没有异同,则没有 .git/refs/remote/origin/master 文件(指向远程的最新 commit id)。
如果有异同,如上修改了提交者姓名和邮箱,会生成 origin/master,然后 git reset 即将当前 head 变更为指定的状态,也就是远程更新后的。
Git diff 技巧
(待整理)
git diff tag                    比较tag和HEAD之间的不同。
git diff tag file               比较一个文件在两者之间的不同。
git diff tag1..tag2             比较两个tag之间的不同。
git diff SHA11..SHA12           比较两个提交之间的不同。
git diff tag1 tag2 file or
git diff tag1:file tag2:file    比较一个文件在两个tag之间的不同。
ORIG_HEAD 用于指向前一个操作状态,因此在git pull之后如果想得到pull的
内容就可以:
git diff ORIG_HEAD

git diff --stat                 用于生成统计信息。
git diff --stat ORIG_HEAD
HEAD vs ORIG_HEAD
关于 HEAD 和 ORIG_HEAD 的区别,来至StackOverflow的回答:
HEADis (direct or indirect, i.e. symbolic) reference to the current commit. It is a commit that you have checked in the working directory (unless you made some changes, or equivalent), and it is a commit on top of which "git commit" would make a new one. UsuallyHEADis symbolic reference to some other named branch; this branch is currently checked out branch, or current branch.HEADcan also point directly to a commit; this state is called "detached HEAD", and can be understood as being on unnamed, anonymous branch.
ORIG_HEADis previous state ofHEAD, set by commands that have possibly dangerous behavior, to be easy to revert them. It is less useful now that Git has reflog:HEAD@{1}is roughly equivalent toORIG_HEAD(HEAD@{1}is always last value ofHEAD,ORIG_HEADis last value ofHEADbefore dangerous operation).
For more information read git(1) manpage, Git User's Manual, the Git Community Book and Git Glossary
其它的一些讲解:
git revert/reset/checkout 区别
讲得挺好的一篇 Undoing Git Changes,关于git checkout, git revert,git reset, git clean 的对比。
统计每个提交者的提交次数
git shortlog --numbered --summary
git reflog
TODO
git cherry-pick
TODO
Git Commit Message 基本准则
一些基本的准则:
- commmit时不建议使用
-m/--message,这样能提交的信息太简单的;建议直接commit通过编辑器来撰写message. -
第一行不超过50个字符,作为简单的描述,第二行为空行,第三行开始再做详细描述,例子(http://git-scm.com/book/ch5-2.html):
Short (50 chars or less) summary of changes

More detailed explanatory text, if necessary.  Wrap it to about 72
characters or so.  In some contexts, the first line is treated as the
subject of an email and the rest of the text as the body.  The blank
line separating the summary from the body is critical (unless you omit
the body entirely); tools like rebase can get confused if you run the
two together.

Further paragraphs come after blank lines.

 - Bullet points are okay, too

 - Typically a hyphen or asterisk is used for the bullet, preceded by a
   single space, with blank lines in between, but conventions vary here
-
第一行 结尾不要用句号,这个可以认为是一个标题
- 第三行 开始的详细描述长度不超过72个字符
-
使用
git diff --check对无用的空白做检查:--check -- warn if changes introduce trailing whitespace or space/tab indents
-
使用
fix,add,change而不是fixed,added,changedWrite the summary line and description of what you have done in the imperative mode, that is as if you were commanding someone. Write "fix", "add", "change" instead of "fixed", "added", "changed".
-
尽量使用英文提交
- 针对Github,在commit message中使用
#id(id 为具体issue的标号),可以把message关联到具体的issue
可以看看Git源码的提交log : https://git.kernel.org/cgit/git/git.git/log/
一些不错的文章:
- 5 Useful Tips For A Better Commit Message
- Git commit 注释格式
- http://www.fwolf.com/blog/post/14
- Writing good commit messages
- Distributed Git - Contributing to a Project
git add 只添加 tracked 的文件
git add 有一个 -u 选项,会只添加tracked的文件,比如在项目根目录下,可以添加所有修改过的已经tracked的文件:
git add -u .
如果单纯的git add . 会把untracked的文件也加进去
删除untracked files
git clean -f
But beware... there's no going back. Use -n or --dry-run to preview the damage you'll do.
If you want to also remove directories, run git clean -f -d
If you just want to remove ignored files, run git clean -f -X
If you want to remove ignored as well as non-ignored files, run git clean -f -x
Note the case difference on the X for the two latter commands.
If clean.requireForce is set to "true" (the default) in your configuration, then unless you specify -f nothing will actually happen, with a recent enough version of git.
See the git-clean docs for more information.
同一个文件选择部分提交
You can do git add -p filename, and it'll ask you what you want to stage. You can then:
- hit
sto split whatever change into smaller hunks. This only works if there is at least one unchanged line in the "middle" of the hunk, which is where the hunk will be split - then hit either:
yto stage that hunk, ornto not stage that hunk, oreto manually edit the hunk (useful when git can't split it automatically)
- and
dto exit or go to the next file. - Use
?to get the whole list of available options.
If the file is not in the repository yet, do first git add -N filename. Afterwards you can go on with git add -p filename.
checkout 指定的 tag
git checkout tags/<tag_name>
git add的几个参数和通配符
git add .stages new and modified, in Git 1.x, without deleted, in Git 2.x, with deletedgit add -ustages modified and deleted, without newgit add -Astages Allgit add *stages new(except name begin withdot) and modified, without deleted
这里得注意, git add . 在 Git 1.x 和 Git 2.0以后是不一样的.
详细讨论见:
检查repo是否dirty
git status --porcelain
关于git提示的状态, 见man git-status的 [OUTPUT] -> [Short Format] 一节
参考:
- Checking for a dirty index or untracked files with Git
- How can I check in a bash script if my local git repo has changes
- How do I programmatically determine if there are uncommited changes?
检查repo当前HEAD是否提示ahead或behind远程仓库分支
比如像这样的:
$ /opt/nlo/nginx# git status
# On branch master
# Your branch is ahead of 'origin/master' by 13 commits.
#
nothing to commit (working directory clean)
使用:
git rev-list --left-right --count origin/master...master
将master与远程仓库origin/master作比较.
如果master的HEAD比origin/master新则报ahead, 否则behind.
返回结果格式是:
{behind}\t{ahead}
参考:
- git: programmatically know by how much the branch is ahead/behind a remote branch
- git ahead/behind info between master and branch?
- git-branch-status
获取当前分支名
在Git 1.8及以后:
$ git symbolic-ref --short HEAD
Git 1.7+:
$ git rev-parse --abbrev-ref HEAD
删除分支
远程分支被删除后(如Github在页面上删除分支), 本地删除追踪分支:
git fetch -p
定期清除远程分支和本地已合并分支是一个好习惯,否则有时会遇到这种本地refs冲突:
$ git pull
remote: Counting objects: 3, done.
remote: Compressing objects: 100% (2/2), done.
remote: Total 3 (delta 0), reused 0 (delta 0)
Unpacking objects: 100% (3/3), done.
error: cannot lock ref 'refs/remotes/origin/feature/new': 'refs/remotes/origin/feature' exists; cannot create 'refs/remotes/origin/feature/new'
From git.coding.net:tankywoo/test-repo
 ! [new branch]      feature/new -> origin/feature/new  (unable to update local ref)
error: some local refs could not be updated; try running
 'git remote prune origin' to remove any old, conflicting branches
因为远程有一个老的分支叫feature在本地有refs, 现在又有一个新的分支叫feature/new, 这样就没法在系统上建立refs目录了。
提示已经很清楚了, 请出指定remote的stale分支, 即远程分支已被删除(上面那条命令效果类似,不过在清除的时候还会下拉新的分支)。
git remote prune origin
Git本地设置某个远程库readonly
如Github, Gitlab等可以在页面上设置某个用户的权限. 不过有时为了防止出问题, 在本地也可以设置.
其实就是简单的将remote url的push地址重写为任意字符串.
$ git remote set-url --push origin 'do not push'
关于 HEAD^ 和 HEAD~ 的区别
HEAD^ 表示当前分支的第一个父分支的第一个点, 等同于 HEAD^1; HEAD^2表示第二个父分支的第一个点
HEAD~1 表示当前分支的第一个父分支的第一个点, 等同于 HEAD~1, 效果也等同于 HEAD^; HEAD~2表示第一个父分支的第二个点.
stackoverflow上这个回答描述的很详细:
G   H   I   J
 \ /     \ /
  D   E   F
   \  |  / \
    \ | /   |
     \|/    |
      B     C
       \   /
        \ /
         A
A =      = A^0
B = A^   = A^1     = A~1
C = A^2  = A^2
D = A^^  = A^1^1   = A~2
E = B^2  = A^^2
F = B^3  = A^^3
G = A^^^ = A^1^1^1 = A~3
H = D^2  = B^^2    = A^^^2  = A~2^2
I = F^   = B^3^    = A^^3^
J = F^2  = B^3^2   = A^^3^2
其它讲解:
查看两个分支的差异
遇到一个问题, 删除一个已合并分支时, 提示此分支没有完全合并:
error: The branch 'xxx' is not fully merged
在so上发现一个给力的回答
$ git log --graph --left-right --cherry-pick --oneline master...experiment
查看某个commit在哪些release(tag)引进
之前考虑的是知道某个commit, 这时就知道它的提交时间, 然后找出release/tag在它之后即可, 也就是:
$ git log --tags --simplify-by-decoration --pretty="format:%ai %d"
然后根据commit的提交时间找到从那个tag开始有.
不过后来想了下, 这块有问题, 因为当前发布分支不一定merge了这个commit.
后来搜到git tag有这个功能--contains选项:
$ git tag --contains <commit id>
延伸下: 如果查看哪些分支包含某个指定commit id:
$ git branch --contains <commit id>
Git subtree & submodule
对submodule的使用应该是非常熟悉了. 听过subtree这个东西有1、2年了, 一直没时间去了解, 前阵子简单了解过, 今晚又看了下文档和一些博客并尝试了(2015-11-11, 好吧, 双十一, 刚剁手完~~~), 也算大致有了一个了解认识.
首先说一下, 国内很多博客人云亦云, 都没什么实践场景, 就跟着别人说: submodule太复杂, 不好用, 应该用subtree. 这个是相当坑爹的.
然后放几个链接, 技术上就不详细说明:
- man git-subtree
- git subtrees: a tutorial 很好的入门资料, 详细的例子
- Alternatives To Git Submodule: Git Subtree
- Git submodule 还是 Git Subtree 评价还算中肯
- 使用GIT SUBTREE集成项目到子目录 里面提到的一些链接文章可以看看
简单说下使用(merge和split还没去尝试):
git subtree add   -P <prefix> <repository> <ref>
git subtree pull  -P <prefix> <repository> <ref>
git subtree push  -P <prefix> <repository> <ref>
subtree add命令将一个项目拉到本地作为一个子目录, 这个和submodule类似. prefix执行子目录名.
子仓库独立更新, 主仓库使用subtree pull命令下拉作更新, 会产生一个merge commit
主仓库下子目录的仓库作了更新, 可以使用subtree push将修改推到子仓库
子仓库可以修改并提交, 这个提交是在主仓库历史可以直接git log看到的(不同于submodule)
因为每次都要敲repository, 可以把这个用git remote增加一个remote alias.
建议:
- subtree pull建议加上
--squash, 将子仓库的多个提交合并为一个提交merge到主仓库, 否则会增加一堆commit. - 主仓库的修改和子仓库的修改分开提交, 主库和子库互相pull/push时会比较混乱
实例:
- Deploying a subfolder to GitHub Pages Jekyll可以用到的一个例子.
感受:
- 至少目前来说, 我还是喜欢submodule
- 说submodule麻烦是因为不了解, 有人说需要.gitmodule配置文件, 我觉得这个的优点之一就是简化文件, 不然每次都要敲prefix, repository很麻烦不是?
- subtree导致历史看起来比较脏, 对于submodule, 主库一个逻辑提交可以直接包含子库的相应commit id即可
- subtree对于一些小项目比较合适
- subtree依赖使用团队的规范约束, 否则历史容易乱.
当然, 上面也只是我了解一些皮毛的感受, 希望后续有机会能更多的去实践.
另外, submodule的教程:
关于子模块:
git submodule status可以用于查看子模块的状态:
$ git submodule status
abf682ed9f412b28e3147e6774b2dc3daa96efbd themes/yasimple (heads/master)
+a26442b58f9d709802af7e07d95657a7ddf3194c themes/yasimple_x2 (heads/master)
其中SHA-1 hash前的flag表示状态:-表示模板在本地没有初始化; +表示子模块的HEAD和被引入的id不一致,即有新的提交没有合并到仓库里。
撤销子模块在本地的注册:
$ git submodule deinit -f --all
Cleared directory 'themes/yasimple'
Submodule 'themes/yasimple' (git@github.com:tankywoo/yasimple.git) unregistered for path 'themes/yasimple'
Cleared directory 'themes/yasimple_x2'
Submodule 'themes/yasimple_x2' (git@git.coding.net:tankywoo/yasimple_x2.git) unregistered for path 'themes/yasimple_x2'

$ git submodule status
-abf682ed9f412b28e3147e6774b2dc3daa96efbd themes/yasimple
-691af22bdfe5315540934809fb9374567f9b7af8 themes/yasimple_x2
如果要删除子模块,而不是撤销,则需要使用git rm命令:
$ git rm themes/yasimple themes/yasimple_x2
rm 'themes/yasimple'
rm 'themes/yasimple_x2'

$ git submodule status  # 输出空
之前没注意,使用deinit后发现没完全清除子模块,于是直接手动删掉.gitmodules文件,导致后来clone报错:
No submodule mapping found in .gitmodule for ...
子模块的文件mode是160000:
$ git ls-files --stage | grep 160000
这样也可以看到实际上子模块还存在,没彻底删除。参考
git diff 相关
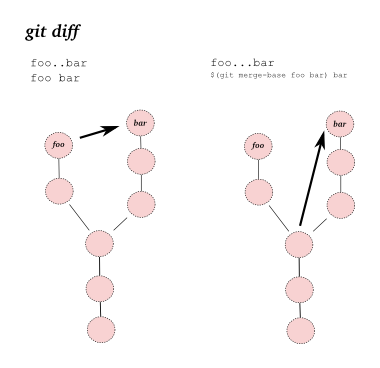
关于 git diff A..B 和 git diff A...B:
参考:
- What are the differences between double-dot “..” and triple-dot “…” in Git diff commit ranges?
- git diff doesn't show enough
- What are the differences between double-dot “..” and triple-dot “…” in Git commit ranges?
git diff 一行太长, 输出混乱
比如一行非常长, 超过了一行, 导致git diff时的输出比较混乱, 超过一行的会覆盖行首的内容, 而不是换行.
本地的环境变量如下:
$ echo $PAGER
less
$ echo $LESS
-R
$PAGER 用于控制文件的显示, 被man或其它程序使用. 可以定义为常用的命令如less, more等.
$PAGER也可以配置为命令加参数选项, 不过更好的方式是配置在各自的环境变量, 如less的$LESS, more的$MORE.
The pager called by man and other such programs when you tell them to view a file.
git自身也有一个环境变量$GIT_PAGER, 如果配置了, 则会覆盖系统的$PAGER.
所以这里的情况可以:
GIT_PAGER='less -RS' git diff /path/to/file
或者应用到git配置中:
git config core.pager 'less -RS'
默认情况, 超过一个屏幕的一行, 会使用wrapped换行, -S将行为改为chopped (truncated), 即隐藏超出一个屏幕宽度的内容, 但是可以右移来显示出来.
另外, -R和-r这两个的区别我还没弄清楚:
Like -r, but only ANSI "color" escape sequences are output in "raw" form. Unlike -r, the screen appearance is maintained correctly in most cases
在$TERM=screen和$TERM=screen-256color时, -r可以正确的wrapped换行, 而-R不行, 不过在指定git diff --no-color时-R可以正确换行. TODO
另外, 我平时经常实用的一个工具cdiff, 没有使用$GIT_PAGER, 所以需要配置$PAGER
参考:
git fetch/pull 小记
一个需求: 假设我在dev分支, 现在我想先更新master分支的代码, 再checkout过去。解决办法:
git fetch origin master:master
在这块遇到了一些之前没注意的问题, 简单记录下。
首先完整的fetch/pull命令是:
git fetch/pull [<options>] [<repository> [<refspec>...]]
基本都知道的是pull就是比fetch多了一个merge。
主仓库master:
*   2d666bc - (HEAD -> master) Merge branch 'dev' (2 hours ago) <Tanky Woo>
|\
| * 9337ee5 - dev 1 (2 hours ago) <Tanky Woo>
|/
* 66f72b2 - init (2 hours ago) <Tanky Woo>
主仓库dev:
* 07e3298 - (HEAD -> dev) dev 2 (61 minutes ago) <Tanky Woo>
* 9337ee5 - dev 1 (2 hours ago) <Tanky Woo>
* 66f72b2 - init (2 hours ago) <Tanky Woo>
子仓库master:
* 66f72b2 - (HEAD -> master, origin/master) init (2 hours ago) <Tanky Woo>
子仓库dev:
* 9337ee5 - (HEAD -> dev, origin/dev, origin/HEAD) dev 1 (2 hours ago) <Tanky Woo>
* 66f72b2 - (origin/master, master) init (2 hours ago) <Tanky Woo>
即master合并了dev的9337ee5提交后, dev又新增了一个提交。
最常规的操作就是直接执行git pull:
$ git pull
remote: Counting objects: 4, done.
remote: Compressing objects: 100% (2/2), done.
remote: Total 4 (delta 1), reused 0 (delta 0)
Unpacking objects: 100% (4/4), done.
From /path/to/repo
   9337ee5..07e3298  dev        -> origin/dev
   66f72b2..2d666bc  master     -> origin/master
Updating 9337ee5..07e3298
Fast-forward
 hello.txt | 1 +
 1 file changed, 1 insertion(+)
子仓库master提交没有任何更新, 有behind提示:
Your branch is behind 'origin/master' by 2 commits, and can be fast-forwarded.
  (use "git pull" to update your local branch)
nothing to commit, working directory clean
子仓库dev:
* 07e3298 - (HEAD -> dev, origin/dev, origin/HEAD) dev 2 (64 minutes ago) <Tanky Woo>
* 9337ee5 - dev 1 (2 hours ago) <Tanky Woo>
* 66f72b2 - (master) init (2 hours ago) <Tanky Woo>
输出的内容分为两部分:
# -------- fetch的内容 --------
From /path/to/repo
   9337ee5..07e3298  dev        -> origin/dev
   66f72b2..2d666bc  master     -> origin/master
Updating 9337ee5..07e3298

# -------- merge的内容 --------
Fast-forward
 hello.txt | 1 +
 1 file changed, 1 insertion(+)
之前对这块研究过一次, 不过时间有点久远, 给忘了。
dev -> origin/dev 表示远端的dev写入到本地的origin/dev。
输出(或者说实际结果)表示, 默认情况下(可以看看.git/config下的fetch配置), 这个操作会:
- (fetch)遍历远端所有的refs, 然后更新到本地的remote/refs
- (merge)远端跟踪分支到当前分支(dev分支)
按照之前的需求, 我猜测pull执行refspec应该可以, 于是执行下面:
$ git pull origin master:master
remote: Counting objects: 1, done.
remote: Total 1 (delta 0), reused 0 (delta 0)
Unpacking objects: 100% (1/1), done.
From /path/to/repo
   66f72b2..2d666bc  master     -> master
   66f72b2..2d666bc  master     -> origin/master
Updating 9337ee5..2d666bc
Fast-forward
子仓库master分支:
*   2d666bc - (HEAD -> master, origin/master, dev) Merge branch 'dev' (2 hours ago) <Tanky Woo>
|\
| * 9337ee5 - (origin/dev, origin/HEAD) dev 1 (2 hours ago) <Tanky Woo>
|/
* 66f72b2 - init (2 hours ago) <Tanky Woo>
子仓库dev分支:
*   2d666bc - (HEAD -> dev, origin/master, master) Merge branch 'dev' (2 hours ago) <Tanky Woo>
|\
| * 9337ee5 - (origin/dev, origin/HEAD) dev 1 (2 hours ago) <Tanky Woo>
|/
* 66f72b2 - init (2 hours ago) <Tanky Woo>
可以看到, 子仓库的master分支和dev分支变成一样的历史, 且都和主仓库的master分支历史树一样。
git pull repo src:dst 的实际操作就是:
- 如果可以做fast-forward, 那么做ff操作把本地的master同步为远端的master
- 然后把本地master合并到当前分支
man git-pull:
The remote ref that matches
is fetched, and if is not empty string, the local ref that matches it is fast-forwarded using .
也就是dev作了一次: (at dev) $ git merge --ff-only master。
最后正确的办法, 也就是不需要上面pull的第二步merge, 即只使用fetch:
$ git fetch origin master:master
remote: Counting objects: 1, done.
remote: Total 1 (delta 0), reused 0 (delta 0)
Unpacking objects: 100% (1/1), done.
From /path/to/repo
   66f72b2..2d666bc  master     -> master
   66f72b2..2d666bc  master     -> origin/master
子仓库master分支:
*   2d666bc - (HEAD -> master, origin/master) Merge branch 'dev' (2 hours ago) <Tanky Woo>
|\
| * 9337ee5 - (origin/dev, origin/HEAD, dev) dev 1 (2 hours ago) <Tanky Woo>
|/
* 66f72b2 - init (2 hours ago) <Tanky Woo>
子仓库dev分支:
* 9337ee5 - (HEAD -> dev, origin/dev, origin/HEAD) dev 1 (2 hours ago) <Tanky Woo>
* 66f72b2 - init (2 hours ago) <Tanky Woo>
之前只是单纯的以为fetch只做拉去更新remote/ref, 但是不做实际的本地合并等修改, 看来这个认识是错的。
另外, 这个还有 +加号的涉及到的no-ff问题, 后续再研究下。
参考:
- Merge, update, and pull Git branches without using checkouts
- Git pull/fetch with refspec differences
- pro git: 9.5 Git 内部原理 - The Refspec
缓存用户名/密码
Git 的 pull/push url 如果是 http/https 的情况下,每次执行 pull 或 push 都需要交互式输入用户名和密码。
Git 提供了 credential cache 的功能,就是将第一次输入的用户名密码缓存到内存一段时间,后续这个时间段内的 git 操作如果需要输入用户名密码,都可以从这个缓存中获取。
详细见文档:git-credential-cache 和 Caching your GitHub password in Git
比如在一个 git 项目里,执行(例子来源上面链接的文档):
$ git config credential.helper cache
$ git push http://example.com/repo.git
Username: <type your username>
Password: <type your password>

[work for 5 more minutes]
$ git push http://example.com/repo.git
[your credentials are used automatically]
如果 git config 没有指定 --global 全局配置,则写操作默认(--local)只针对当前项目,后续还有其它项目,则需要在 pull/push 之前先再执行 git config credential.helper cache 使这个项目也配置 cache。
另外,默认的缓存时间目前是 900s,也可以改超时时间:
$ git config credential.helper 'cache --timeout=300'
题外话:
最近写一个脚本,习惯在脚本开始获取 git 的用户名密码保存在变量中,然后后续使用,也可以如下:
read -p "Input git username: " GIT_USER
read -s -p "Input git password: " GIT_PASS
git clone http://${GIT_USER}:${GIT_PASS}@example.com/repo.git
另外一个情况,很多工具可以通过环境变量指定用户名密码,如:USERNAME=tankywoo PASSWORD=*** my-command
git 也可以实现这种情况,关于 credential,git 默认提供两种方式(helper):cache 和 store,后者存在磁盘。
但是其也支持使用第三方 helper,可以实现这个功能:
# on Gentoo
$ cat /usr/libexec/git-core/git-credential-read-env
#!/bin/bash

if [[ $# -eq 1 && $1 == "get" ]] ; then
    if [[ -z ${USERNAME} || -z ${PASSWORD} ]] ; then
        exit 0
    fi
    echo "username=${USERNAME}"
    echo "password=${PASSWORD}"
fi

exit 0

$ cat ~/.gitconfig
[credential]
    helper = read-env

$ USERNAME=tankywoo PASSWORD=*** git pull
具体需要看 gitcredentials 和 man git-credential。
将自定义的脚本放到指令路径下,通过git help -a | grep credential- 可以搜到,然后配置 [credential],名称为不包含git-credential-的名字即可。
(TODO:有一个坑,在 zsh 下报错:remote: HTTP Basic: Access denied,暂时未找到原因。)